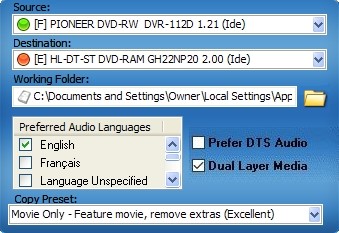
1CLICK DVD COPY - PRO

If you wish to copy DVD movies which are encrypted, you'll also need to install decrypting software.
If you are having problems registering the software, click here.

1CLICK DVD COPY - PRO is very simple to use.  To copy a DVD, click the "START" button. 

There are several "Copy Presets" which are pre-configured to give you the best results. There are also powerful custom features which offer you total control over the content of your DVD.  Please read more about the Copy Presets and other features before making changes to the default settings. You will also see hints (popup captions) when you move the mouse arrow over each control.  These hints highlight the use of each control.  Note: You can open this user guide by clicking "?" (help) button or by clicking the F1 keyboard key.


Source: DVD reader or hard drive folder which contains the movie files.

Destination: DVD writer or hard drive folder where you will copy the movie.

Note: The program will attempt to choose your DVD reader and writer at start up, but if you have more than one device, you may need to select them manually.

Working Folder: A temporary folder where the program will write temporary files while copying.  This folder will need to be as large as 5 GB in most cases.  By default the software will select the standard Windows application data folder.


Preferred Audio Languages:
Use this option to select the audio languages you wish to keep on the copied DVD. You will only see a list of languages available on the DVD you are copying unless the source is empty, in which case you'll be able to select from a list of all possible languages.

In some cases you may see a language described as "Unspecified", which indicates that the language was not specified when the original DVD was created. In cases where the language you've chosen is not available, the default audio language on the DVD will be copied.

Prefer DTS Audio: Enable this option to copy "DTS" audio (a high definition audio format similar to Dolby Digital) instead of Dolby Digital AC3 audio, when it's available. DTS audio occupies far more space on a DVD than AC3 audio so we recommend you disable this option to preserve the highest video quality. This option is disabled by default.

Include Subtitles: Enable this option to include all subtitles with your movie. This option is disabled by default.

Movie Only Menus: Enable this option if you want a menu when using the "Movie Only" copy preset. Keeping a menu on a "Movie Only" copy may cause some menu options to function incorrectly because the extras have been removed. We recommend you disable this feature to increase playback compatibility on your DVD player. This option is disabled by default.

Dual Layer Media: This option is disabled by default. When enabled, it permits you to make an exact copy of any movie DVD.  If you are not using Dual Layer recordable media, this option should be disabled.

Copy Presets: There are several pre-configured "Copy Presets" that you can choose from to copy a DVD.  It is not necessary to use the more advanced custom compression settings to copy a DVD and we recommend you only use those settings once you fully understand how they work.  We have provided you with a great deal of power, but also the simplicity of copying with one click if you choose to use a copy preset. The following describes the use of each copy preset:


Movie Only: This preset will copy the widescreen (if available) movie and remove the extras. Menus will also be removed unless the "Movie Only Menus" is enabled (not recommended). It will copy the audio languages corresponding to the "Preferred Audio Languages" and will remove any redundant audio tracks (ex. DTS and AC3 in the same language). This is the default preset and is recommended for the best video quality.

Movie & Extras: This preset will copy the widescreen (if available) movie, extras and menus.  It will remove redundant audio and redundant aspect ratios (ex. widescreen and fullscreen).

Episode DVD: Select this option if you are copying an "Episode" DVD.  An episode DVD usually contains several episodes of a television series. Selecting the "Episode DVD" option will ensure that all the episodes are copied. Mistakenly using the "Movie Only" preset on an Episode DVD could result in only one episode being copied. The program will attempt to recognize Episode DVDs when they are scanned, but this detection process is not perfect and is only there to help remind you if you forget.

Full Disc: This option will copy everything in the VIDEO_TS folder (ie. no data files) from the original DVD and attempt to compress the video sufficiently to make the copy fit on a 4.7 GB disc.  Consider the fact that an original DVD can be as large as 8.5 GB and you'll see that this may require considerable video compression (audio data is always copied without compression).  All audio, video and subtitles will be copied, including extras, menus and redundant audios and aspect ratios.  We highly recommend that you do not use this option because it could result in poor quality video on DVDs which contain a large amount of video and audio information.

Exact Copy: Use this option to make an exact duplicate of the original DVD (ie. no compression).  Unless your original DVD is less than 4.7 GB (rarely), you must use Dual Layer media (select the "Dual Layer Media" option) when this option is enabled.

Custom: Use this option to manually select Titlesets, Menus, audio, video and subtitles.  Note: If you change any of the items selected by a Copy Preset, the "Custom" will automatically be enabled.


Video Preview window:

There are three buttons on the Video Preview window:

?: 
Help Manual/Registration Dialog.
--:  Minimize the application.
X:  Close the application.

You can view the contents of a Titleset or Menu item by clicking on the item in the Properties Window. To change the position within the video, click on the slider bar (at the bottom of the Video Previewer) and slowly drag the mouse to the left or right. The previewer is not a DVD player - it's used to view the content of a Titleset or Menu.

Note: Each time you select a new Source (change DVDs for example) the application will scan the DVD, select the feature movie, and set the Video Preview to the middle of the movie (the first frame of most movies is black).


The video previewer uses two FFMPEG libraries: avcodec and avformat. These libraries are licensed under the GNU Lesser General Public License. You may download the source code for FFMPEG here.


Properties Window - Recommended for advance users only.

The Properties window permits you to manually select the content of your DVD, as well as how much compression is applied to each of the video streams you include.

At the top of the window is the compression bar, which indicates the overall video compression required to make the original DVD fit on the destination (usually a 4.7 GB DVD).  The lower the percent compression, the better the video quality will be on the copied DVD. To ensure the highest possible quality, the overall video compression has a practical limit of 55%.

There are two types of files that contain audio, video and subtitle information; they are Titlesets and Menus.  Both of these file types can contain audio, video and subtitle information. The largest Titleset on a DVD is most often the feature movie, while other Titlesets may be extras. A Titleset will usually span more than one file on the original DVD. If you examine the contents of the DVD you will find several files with a ".VOB" extension.  Each of these files belongs to a Titleset or a Menu.

VOB files are numbered as VTS_XX_NN.VOB, where 'XX' is the Titleset number (if 'NN' is not zero), and 'NN' is the file number.  So for example, a file with the name VTS_03_02.VOB would indicate that this file corresponds to 'Titleset 3' and is file number 2 of the Titleset ('set' implying there are one or more files). Menus always have 'NN' equal to zero.  For example, 'VTS_03_0.VOB' would indicate this is 'Menu 3'.  The root menu (otherwise known as the 'Video Manager') is always named "VIDEO_TS.VOB" and most often contains the warnings commonly seen when a DVD first starts up, but can contain menu information as well.

You will see from the diagram above (upper left corner) that this DVD contains 31 Titlesets.  The number just to the right (4377 Mb in this example) is the estimated final size of the DVD with the current compression settings. The application will always attempt to make this as close as possible to the target size of a single layer recordable DVD, 4.38 GB.

To the right of each Titleset number you will find the playing time and the total file size of the Titleset. In most cases VOB files are limited to 1 GB on DVDs, so the larger Titlesets will often include several VOB files.  To the right of file size is the compression combo box.  In the example above, it is set to the default "Automatic" setting.  There are four possible settings as follows:

Remove: Selecting "Remove" will disable the Titleset check box and the Titleset will not be included on the copied DVD.

Automatic: This option must be selected if you don't want to manually set the compression settings yourself.  We recommend for the best results that you use Automatic as your preferred setting.  There may be times when you want to give up some quality in the extras to obtain even better quality on the feature film, so in these cases you can revert to the "Custom" setting to make manual adjustments.

Custom: This option will permit you to manually adjust the video compression of the Titleset (using the slider bar to the right of the compression percentage box). In some cases you will not be able to make large changes to the percent compression unless you disable other Titlesets.  There is a finite amount of space on the destination DVD and this limit must always be respected. Fortunately, the software will always recalculate and adjust the video compression on any other Titlesets where the compression setting is set to "Automatic".  The program will also prevent you from creating a DVD which is too large for the destination.

Exact Copy: Selecting "Exact Copy" will ensure that the Titleset is copied without any compression. In some cases where the file size is quite small, the program will automatically enable this setting.  We recommend you do not use this setting on larger files to ensure that you can achieve the required destination file size through video compression.

Audio and Subtitles:

Each Titleset and Menu can contain one or more audio and subtitle streams. You can view these streams by clicking on the '+' to the left of the Titleset check box.  Audio streams are described first by the language, then by the type of audio and lastly by the number of audio channels.  In the example below, you can see that we have 1 audio stream, with a file size of 365 Mb. This audio is in English, is AC3 audio (otherwise known as 'Dolby Digital' audio) and it contains 6 channels.


Subtitle streams are very small and do not contribute in any significant way to the overall file size of the DVD so their size is not listed.  We highly recommend that you include subtitles on all menus (default behavior of all copy presets) because some DVD menus depend on them to function properly. Including subtitles does not mean they will always be visible when playing the DVD, it only means they are available if required or selected on playback.


Additional Options:

If you click the right mouse button anywhere on the application, an options menu will be displayed as shown below:

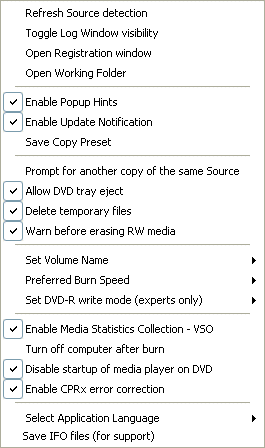
Refresh Source detection: Re-scans the Source DVD. Use this if you change DVDs and the information in the properties window has not refreshed to show the new source material.

Toggle Log Window visibility: Show or hide the log file window for the current copy session. The log file contains information about copy settings and DVD burning. NOTE: You can also open the entire log file (including previous copy sessions) using the F8 keyboard key. This will open the entire log file ("1clickPro.log") in Windows Notepad. This is helpful if you want to quickly locate and save the log file to send to support in an email attachment. It is important that you include this log file with your email correspondence when requesting support.

Open Registration window: Launches the Registration window where you can enter your Registration ID or offline Activation Code.  You can also determine the software version number in the window title bar. NOTE: You can also use the F2 keyboard key to open the Registration window.

Open Working Folder: Opens the temporary folder used by the application.


Enable popup Hints: Show or hide the pop up hints that appear each time you hover over a control on application interface.

Enable update notification: Launch an internet browser window to the website download page when a new version of the software becomes available for download.

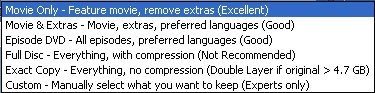
Save Copy Preset: When enabled, the current setting of the Copy Preset is saved and restored when the application is reopened.  If disabled, the Copy Preset will assume the default setting: "Movie Only". In order to avoid mistakenly using a Copy Preset that is not applicable to the next movie you copy, we do not recommend you enable this option to save the last Copy Preset. However, if you consistently copy movies with extras, you may find this option useful. Note: The "Exact Copy" and "Custom" Copy Presets are never saved, regardless of this option's state.


Prompt for another copy of the same media: Enable this option if you want to receive a prompt after the DVD is burned to burn a second DVD of the same copied movie.

Allow DVD tray eject: Enable or disable the automatic ejection of the original DVD tray during copying and burning. You may wish to disable this option if your computer is stored in a cabinet and you want to prevent the disc tray from opening without your intervention. This option is enabled by default.

Delete Temporary Files: When enabled, this will ensure that all the temporary files (in the Working Folder) that are used for each copy session are deleted when they are no longer needed. You may want to disable this feature if you want to keep a copy of each movie you burn in your Working Folder.  The application will warn you if another movie with the same volume name already exists in the Working Folder.

Warn before erasing RW media: When enabled, you will get a message box telling you that the RW disc is not empty if it contains data from a previous copy, prior to being erased/formatted.
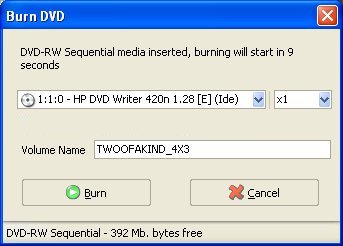
 

Set volume name: Use this option to manually enter the volume name of the DVD before it's burned.  By default, the program will use the volume name on the original DVD.  In some cases however, the volume name may be inadequate to properly identify the name of the movie. Once you click on this option, you'll see a text box labeled "Volume Name" where you can enter the name you prefer.

Preferred burn speed: Use this option to manually select the preferred maximum burn speed. In some cases, you may need to lower the write speed to ensure your DVD writer will successfully burn the DVD.

Set DVD-R write mode (experts only):  We recommend you leave the default setting "Automatic (burn engine decides - default)". Letting the burn engine decide the write mode allows the engine to select the best writing mode for the drive in most cases. The other writing mode options permit you to set your preferred DVD-R writing mode. The preferred mode will be respected only if the burner and media combination support that mode. The write mode selected by the write engine will be reported in the log file for each burn.


Enable Media Statistics Collection - VSO: 1CLICK DVD COPY - PRO uses a writing engine (for burning DVDs) which is licensed from VSO Software. VSO uses an online reporting system to gather information about DVD writers and blank media to improve the writing engine. This information will also help you to choose the best media for your DVD writer. This feature is enabled by default and will send DVD media statistics via internet each time a DVD is burned. You can disable this feature by un-checking the check box.

Turn off computer after burn: Enable or disable automatic shutdown of the computer after a successful burn.  This is useful if you wish to leave the computer unattended to burn a copy and you want the computer to shut down after the burn is completed.

Disable startup of media player on DVD: Enabling this option will help to prevent the automatic startup of some free DVD player programs (like "Interactive Media Player") when the DVD is inserted. Some of these programs may interfere with the proper reading of the DVD. This option is enabled by default.

Enable CPRx error correction: This option is enabled by default. CPRx error correction is essential to deal with DVDs which have bad sectors or bad structure. Many new DVD releases now require CPRx error correction to copy correctly.  We recommend you do not disable this feature unless you have a third party utility which is capable of doing it's own error correction in concert with 1CLICK DVD COPY.


Select Application Language: This option permits you to select the language that will be used on all windows of the application.

Save IFO files (for support): This option permits you to save the IFO (navigation) files on the original DVD to a compressed file (in the ZIP format) which can be sent to our support group to assist in troubleshooting authoring issues on some DVDs.

Burn DVD:

Once the copying (transcoding) is complete, a 'Burn DVD' dialog will pop up (as shown below).  If you use the same DVD device for reading and writing, you'll be asked to insert a DVD.  If you have a separate DVD reader and writer, the copy process can be accomplished in one step. In both cases, you have the opportunity to make changes to both the DVD volume name and the writing speed, prior to the burning taking place. There is a 20 second delay before the burning begins in which you can initiate any last minute changes.


The following are essential for success: 

  • Ensure the DVD you want to copy is clean and free of defects (visible scratches or other imperfections) and make sure you can play the DVD before you try to copy it.  Use a software player like WinDVD or PowerDVD to play the movie for about one minute. This will "authenticate" the DVD device, something that may be important on some hardware configurations.
     

  • Update your DVD writer firmware.  Many DVD writers are not compatible with newer DVD media/formats until the firmware has been updated. You can get firmware updates here: http://www.cdrinfo.com/Sections/Firmware/Home.aspx
     

  • Use high quality recordable DVD media. There is a reason good media costs more than the cheap imported media. Media that costs half the price of good media can fail as often as 50% of the time. Cheaper brands (like"Memorex") are not recommended by our users. We recommend "Verbatim" discs because of their quality. Always refer to the DVD writer manufacture for the list of recommended media for your DVD writer.
     

  • Disable "Quiet Drive".  Many newer DVD readers/writers slow down the read speed to 2X (regardless of the published read speed) when reading movie DVDs in an attempt to lower the background noise while playing the movie. When Quiet Drive is enabled, the time required to copy a movie will increase dramatically due to the slower read speed. By default, Quiet Drive is always on and can often be disabled using the manufacture's supplied software.  However, some manufactures have not provided software to disable this feature and in these cases you must download a modified (patched) firmware to disable this feature.

If you encounter any difficulty copying or burning a DVD, please refer to our online FAQ page. You will also find helpful links available on our Contact page where you'll also find a link to an online Forum.